USA
USA Canada
How to Plan and Complete a Hydronic In-Floor Heating Installation from System Design to Commissioning
Radiant in-floor heating installation puts warm water tubing beneath your finished floor, turning the entire floor surface into a gentle, even heat source. Done correctly, it is one of the most comfortable and energy-efficient heating systems available. Done poorly, it creates problems that are difficult and expensive to correct after flooring is installed.
This guide walks through how hydronic in-floor heating installation works, what the key components are, and what decisions affect the system’s long-term performance. Whether you are planning a new build or a remodel, understanding the process helps you ask better questions and make better choices before work begins.
Wet vs. Dry Installation: The First Major Decision
Every radiant in-floor heating installation falls into one of two categories: wet or dry. The difference determines how the tubing is embedded, how fast the system responds, and how the flooring is installed on top.
Wet installations embed the tubing in a concrete slab or a poured gypsum layer over a wood subfloor. The mass of the concrete stores heat and releases it slowly. These systems work well in slab construction and can pair with passive solar design, but they respond slowly to thermostat changes and make aggressive setback scheduling impractical.
Dry installations use pre-routed panels or aluminum diffuser plates to hold the tubing without any poured material. Heat transfers directly through the aluminum into the floor above. Dry systems are faster to build, faster to respond, and ready for finished flooring the same day the panels go down. WBI panel systems are a dry installation approach.
Key Point: Wet (slab or gypsum pour) systems have more thermal mass and slower response. Dry panel systems respond faster, install in less time, and work better with modern heat pumps that operate at lower water temperatures.
The Components of a Hydronic In-Floor System
A complete hydronic radiant in-floor heating installation has four main components: the heat source, the distribution system (manifold), the tubing loops, and the floor assembly that holds the tubing. Each component affects the others, so the system has to be designed as a whole before any panels or tubing are ordered.
Heat Source
The heat source is whatever heats the water circulating through the floor. Common options include condensing gas or propane boilers, oil boilers, electric boilers, and air-to-water heat pumps. Condensing boilers achieve their highest efficiency at lower supply water temperatures, which makes them well-suited to radiant systems. Air-to-water heat pumps also perform best at the low supply temperatures (90 to 120 degrees F) that modern panel systems require.
The heat source is selected based on available fuel, local energy costs, and the system’s design temperature. A radiant designer calculates the heat loss of the home first, then sizes the boiler or heat pump to match.
Manifold
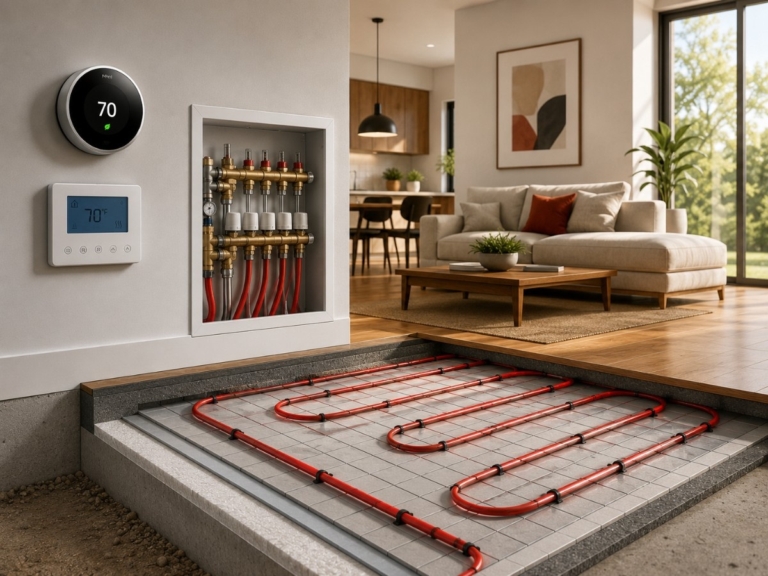
The manifold is the central distribution point where hot water is sent to individual tubing loops and returned after circulating through the floor. Each tubing loop connects to one port on the manifold supply and one port on the return. Zone valves on the manifold allow different areas of the home to be controlled independently.
Manifolds are typically located in a mechanical room, utility closet, or recessed cabinet. They include flow meters for balancing the system, fill/drain ports for commissioning, and sometimes integral actuators for zone control.
PEX Tubing
Crosslinked polyethylene (PEX) tubing carries heated water through the floor. Typical diameters for residential in-floor heating are 3/8-inch and 1/2-inch. Loop lengths are calculated during the design phase to keep flow velocities and pressure drop within acceptable ranges.
PEX-A tubing is the most flexible type and easiest to work with around corners and in tight panel grooves. Oxygen-barrier PEX is required for hydronic systems that include ferrous components like cast iron circulators, because bare PEX allows oxygen to diffuse through the tubing wall and cause corrosion.
The Installation Process: Step by Step
Radiant in-floor heating installation follows a consistent sequence regardless of substrate type. The exact steps within each phase vary depending on whether the floor is a wood subfloor, a concrete slab, or a retrofit project over existing flooring.
Step 1: Heat Loss Calculation and System Design
Every successful installation starts with a room-by-room heat loss calculation. The calculation determines how much heat each zone must deliver to maintain comfort on the coldest design day. This drives the tubing layout, loop lengths, supply water temperature, and heat source sizing.
Skipping the design phase and guessing at tubing spacing is a common mistake. Tubing spaced too far apart creates striping, where the floor is warmer over the tubes and cooler between them. Tubing spaced too tightly wastes material and can overheat the floor in mild weather.
Step 2: Panel or Substrate Preparation
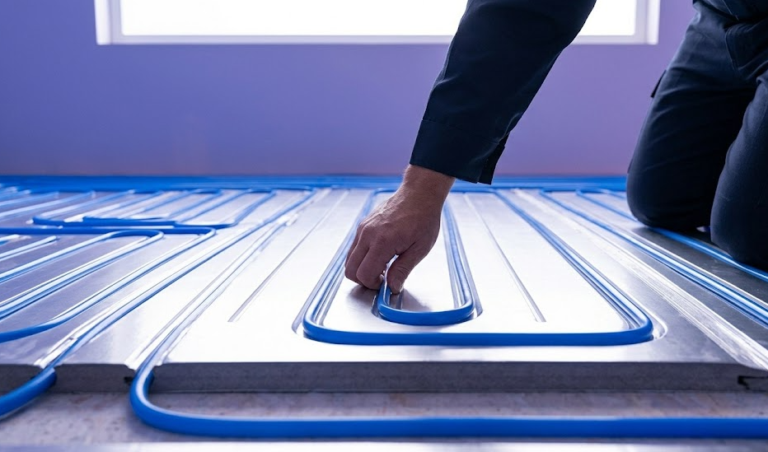
For wood subfloor installations, the subfloor must be flat, dry, and structurally sound before panels go down. WBI RadiantBoard panels are laid directly over the subfloor in a staggered pattern similar to hardwood flooring. Each panel arrives pre-routed with aluminum-lined grooves sized to accept PEX tubing.
For slab installations, rigid foam insulation is placed over the concrete first. The insulation provides a thermal break that directs heat upward rather than down into the slab mass. Without this layer, a significant portion of the heat output is wasted into the ground.
For retrofit projects over existing flooring, low-profile ThermalBoard panels can be installed directly over tile or resilient flooring when the substrate is sound and level. This approach avoids full floor removal and dramatically reduces disruption to the space.
Step 3: Tubing Layout and Installation
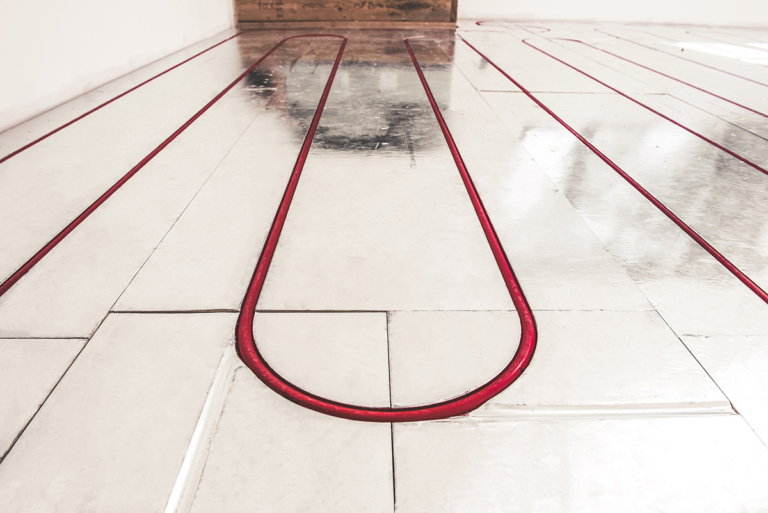
Tubing is pressed into the pre-routed panel grooves and secured in place. The aluminum channels grip the tubing and spread heat across the panel surface between tubes, which eliminates the striping that can occur in systems without metal diffusion. Loops are laid in a serpentine pattern that distributes heat evenly from supply to return.
Each loop is kept to a length that the design specifies, typically 150 to 300 feet for 1/2-inch tubing. Loop ends are routed back to the manifold location and labeled clearly before being connected.
Key Point: Aluminum heat-transfer channels in WBI panels spread heat between tubing runs, eliminating striping and allowing wider tube spacing without sacrificing comfort. This reduces material cost and keeps supply temperatures lower.
Step 4: Manifold Connection and Pressure Testing
All loop ends connect to the manifold ports. Flow meters on the manifold supply side allow each loop to be balanced during commissioning. Before any finished flooring is installed, the system is pressure-tested with air or nitrogen to confirm there are no leaks in the tubing or connections.
Pressure testing is a non-negotiable step. Finding a leak under ceramic tile after the floor is complete requires demolition. Confirming integrity at this stage takes less than an hour and prevents an expensive problem.
Step 5: Finished Flooring Installation
Once the tubing is in place and the system has passed pressure testing, finished flooring goes directly over the panels. Ceramic and porcelain tile install with thin-set mortar applied over the panel surface. LVP and laminate float on top with a thin underlayment. Engineered hardwood can be glued or floated, depending on the manufacturer’s guidelines.
Solid hardwood flooring can be used over radiant heat, but it requires acclimation, a floor temperature limit (typically 80 to 85 degrees F), and selection of species that are stable at low humidity. Most installers recommend engineered wood instead of solid planks for long-term stability.
Step 6: Mechanical Connections and Controls
The plumbing contractor connects the manifold to the heat source, installs the circulator pump(s), and sets up zone valves or zone pumps for each thermostat circuit. An outdoor reset controller is strongly recommended at this stage. It monitors outdoor temperature and adjusts the supply water temperature automatically, improving efficiency and reducing floor temperature swings.
Thermostats are installed in each zone. Radiant-specific thermostats with adaptive recovery work best because they account for the floor’s slower response time and start heating early enough to reach setpoint by the scheduled time.
Step 7: System Fill, Purge, and Commissioning
The system is filled with treated water (or a glycol mix in climates where the mechanical room can freeze), bled of air, and brought up to operating pressure. Each loop is balanced at the manifold using the flow meters. The heat source is started and the system is run through a full heating cycle before anyone walks away.
Commissioning also includes setting the outdoor reset curve, programming thermostat schedules, and verifying that zone valves open and close as expected. A well-commissioned system should reach stable operating conditions within a few days.
Substrate-Specific Considerations
The substrate type affects every aspect of the installation: panel selection, insulation requirements, floor height addition, and compatible flooring choices.
Over a wood subfloor, WBI EcoWarm RadiantBoard panels add approximately 7/8 inch of height. The insulated EPS-backed version adds slightly more but provides better thermal separation from the framing below. ThermalBoard panels for retrofit applications add as little as 5/8 inch, which is often less than the flooring that was removed.
Over existing concrete, WBI EPS-backed panels provide the thermal break that a bare slab lacks. Without insulation under the tubing, a slab radiant system heats the concrete mass as much as the room above. Adding insulation between the slab and the radiant panel cuts heat-up times and lowers operating water temperatures.
In new concrete slab construction, tubing is tied to rebar or a wire mesh before the pour. This approach is the lowest-cost installation method but requires careful coordination: the tubing must be pressurized during the pour so any punctures can be detected and addressed before concrete covers them.
Panel Systems vs. Staple-Up Installation
Staple-up is an older installation method where tubing is attached to the underside of the subfloor between the joists, with reflective insulation below the tubing to direct heat upward. It is the least expensive approach for adding radiant heat in an existing home where the ceiling below is accessible.
The downside is performance. Tubing stapled to the underside of a subfloor has a significant air gap between the tube and the floor surface. Heat has to bridge that gap, which requires higher water temperatures and longer run times. Comfort is noticeably less even than a panel system where the tubing is in direct contact with a heat-conducting surface.
Over-subfloor panel systems eliminate the air gap. The aluminum channels in WBI panels conduct heat from the tube directly into the panel surface and, from there, into the finished floor above. Supply water temperatures can be 20 to 30 degrees F lower compared to a staple-up installation delivering the same heat output. Lower supply temperatures mean higher efficiency from condensing boilers and better coefficient of performance (COP) from heat pumps.
What Radiant In-Floor Heating Installation Costs
Installed costs vary based on home size, substrate type, heat source, zone count, and flooring selection. A rough planning range for a whole-home hydronic installation with a new boiler is $15 to $30 per square foot of heated area. Simpler projects with existing heat sources sit at the lower end. Complex multi-zone new construction with premium heat pump systems sit at the upper end.
Panel systems reduce labor compared to wet-pour alternatives because there is no curing time and no specialty subcontractor required for the pour. The panels are ordered custom-cut to the room layout, which reduces waste and simplifies layout on the job site.
Comparing radiant installation cost to forced-air installation cost directly is not always accurate. Radiant systems eliminate the ductwork, air handler, and associated electrical that a forced-air system requires. On a whole-system comparison for a new home, the cost difference is often smaller than the line-item cost of the radiant floor assembly alone.