 USA
USA Canada
Choosing the Right Over Slab Radiant Heating System
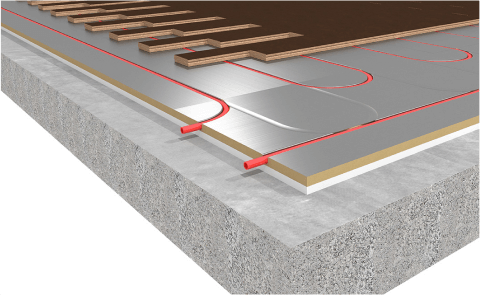
If you’re installing hydronic radiant heat over concrete slab, the right approach depends on what’s under the slab. On uninsulated or poorly insulated slabs, traditional in-slab tubing can waste energy into the concrete. WBI’s over-slab insulated radiant panels, Ecowarm RadiantBoard® EPS (plywood core, 1/2″ PEX) and ThermalBoard EPS (MDF core, 3/8″ PEX), move the radiant heat on top of concrete slab and place EPS insulation directly beneath the aluminum panel to reduce downward heat loss and speed response.
Already have proper underslab insulation? You can use Ecowarm RadiantBoard® or ThermalBoard (non-EPS) directly over the slab. However, EPS-backed systems are still preferred when height allows because they further limit downward losses and improve comfort at lower water temperatures.
Whether you are installing a new heated concrete floor from scratch or adding radiant heat to an existing concrete slab, WBI’s over-slab panel systems offer a clean, low-mass alternative to traditional in-slab tubing and wet overpours. This page covers everything you need to select, plan, and install the right hydronic radiant floor heating in concrete slab applications for your concrete project.

Why Radiant Heat Over Concrete Slab?
Concrete is strong, but it’s also a massive heat sink. When you place the heat emitter at the floor surface and include a thermal break under it, more of your BTUs move up into the room. That means:
- Faster warm-up and recovery from setbacks.
- Lower supply temperatures (great for condensing boilers and air-to-water heat pumps).
- Better zoning and comfort in basements, slab-on-grade additions, remodels, and garage conversions.
Hydronic radiant floor heating in concrete slab systems use circulating warm water through PEX tubing to heat the floor from below the finish surface. Unlike forced-air systems, a properly designed heated concrete floor delivers even, draft-free warmth that rises naturally through the living space. Rooms stay at a consistent temperature from floor to ceiling, with no cold spots or hot-air stratification.
For contractors and homeowners evaluating heated concrete slab options, WBI’s over-slab systems offer a significant advantage: they work at lower water supply temperatures (typically 90°F to 120°F), which pairs directly with high-efficiency condensing boilers and air-to-water heat pumps to maximize seasonal efficiency.
Key Challenges of Traditional Methods
- Downward heat loss on uninsulated slabs: A significant share of energy migrates into the concrete before it reaches the room, which can be reduced using concrete slab insulation for radiant heat.
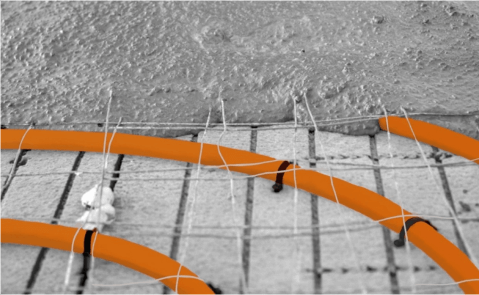
- Slow response of high-mass systems: In-slab tubing or wet overpours can take hours to heat/cool—frustrating for tight schedules or variable occupancy.
- Wet trades & curing time: Gypcrete/overpours add moisture, weight, and project delays, and can complicate transitions at doors and stairs.
- Flooring limitations: Higher surface temps sometimes needed to overcome mass can clash with certain floor goods and adhesives.
- Difficult retrofits: Cutting or trenching an existing slab introduces dust, noise, and cost, with uncertain results, especially when trying to retrofit radiant heat concrete floors.
- Higher operating costs: Traditional in-slab systems often require higher supply water temperatures to compensate for heat loss into the slab mass, reducing efficiency when paired with modern condensing boilers or heat pump systems that are optimized for lower supply temps.
Benefits of Installing Radiant Heat Over Concrete
- Low-mass, high-control comfort: Aluminum-laminated panels deliver rapid warm-up and precise thermostat response.
- Lower operating temps: Efficient at modest water temperatures—ideal for heat pumps and modern modulating/condensing boilers.
- Integrated EPS insulation: EPS under the panel reduces (does not “stop”) downward heat flow into the slab, pushing more heat into the occupied space. This makes radiant heat insulation for concrete slab systems more efficient.
- Clean, dry installation: Adhesive + mechanical fastening; no curing or wet trades, minimal disruption during remodels.
- Slim, configurable build-ups: Multiple thickness/R-value families to meet height limits and transition needs.
- Finish-floor friendly: Works with common floor goods—tile/stone, engineered hardwood, LVP/LVT, laminate, carpet (with proper cushion), and more (follow flooring and panel guidelines).
- Ideal for retrofit and existing slab applications: Adding radiant heat to an existing concrete floor is straightforward with WBI’s dry-install panels. No core drilling, no trenching, no extended downtime.
Why Concrete Slab Insulation for Radiant Heat is Essential

Insulation is the difference-maker on concrete. Without a thermal break, heat readily conducts into the slab. Placing concrete floor radiant heat insulation directly under the panel:
- Creates a thermal break that reduces downward losses.
- Improves upward output so rooms reach setpoint faster at lower supply temps.
- Helps maintain flooring-friendly surface temperatures and even heat across the room.
If your slab already has proper underslab insulation, you can run Ecowarm RadiantBoard (plywood, 1/2″ PEX) or ThermalBoard (MDF, 3/8″ PEX @ 8″ o.c.) directly over the slab. You’ll still gain additional efficiency and comfort with EPS-backed radiant heat over uninsulated slab versions where height allows.
Concrete floor radiant heat insulation does more than reduce downward energy loss. It raises the effective panel surface temperature at lower water supply temps, which is critical when pairing a heated concrete slab with a heat pump or condensing boiler. For uninsulated or under-insulated slabs, EPS-backed panels like Ecowarm RadiantBoard EPS and ThermalBoard EPS deliver the most efficient path to a comfortable heated concrete floor.
Insulation under concrete slab radiant heat systems also protects your flooring investment. By keeping surface temperatures stable and within the tolerance range of your chosen finish floor, EPS insulation reduces the risk of adhesive failure, warping in engineered hardwood, and grout cracking in tile installations.
| The New Way (Over-Slab Insulated Panels) | The Old Way (In-Slab or Wet Overpours on Uninsulated Slabs) |
|---|---|
|
Purpose-built for uninsulated or under-insulated slabs. Both options bond aluminum radiant panels to EPS insulation, then fasten to the slab for a dry, responsive assembly.
|
|
|
|
Installation Overview

Shared Over-slab Assembly Steps
- Moisture & vapor check: Verify slab moisture; apply a slab sealer or verify a continuous vapor barrier strategy as required.
- Set panels: Use approved construction adhesive and mechanical fastening per the installation manual.
- Place tubing: Press PEX into factory aluminum grooves (1/2″ for Ecowarm RadiantBoard EPS; 3/8″ for ThermalBoard EPS ). This method supports efficient pex radiant floor heating in concrete applications.
- Finish floor: Install underlayment/finish per flooring and panel guidelines.
If the Slab Already Has Proper Underslab Insulation
- Use: Ecowarm RadiantBoard or ThermalBoard (non-EPS) directly over concrete for a lower profile build.
- Why EPS is still preferred: Even with underslab insulation, EPS under the panel further reduces downward losses, maximizes comfort, and can allow lower supply temperatures—a win for operating cost and heat pump performance.
- When non-EPS makes sense: Tight transitions, doors, or stairs where every fraction of an inch matters, and the slab’s underslab insulation is confirmed to code or better.
Implementation Notes
- Controls: Pair low-mass panels with outdoor reset and smart thermostats for stable comfort and efficiency.
- Water temps: Many projects operate comfortably with supply temps well below traditional in-slab systems.
- Flooring: Confirm adhesives and underlayments are compatible with radiant and expected surface temperatures.
- Moisture: Always address vapor/alkalinity on existing slabs before installing any panel system.
This is especially important when evaluating how to install radiant floor heating in concrete slab retrofit projects effectively.
Quick Selection Snapshot
- Uninsulated or under-insulated slab: Choose Ecowarm RadiantBoard EPS (1/2″ PEX, plywood) or ThermalBoard EPS (3/8″ PEX, MDF) for optimal above slab radiant heat performance.
- Properly insulated slab, minimal height: Use Ecowarm RadiantBoard or ThermalBoard (non-EPS).
- Properly insulated slab, height available & max efficiency desired: Choose EPS-backed versions, they still deliver better upward output and lower water temps.
For projects requiring electric radiant floor heating in concrete slab systems, proper insulation and floor compatibility remain equally important for performance and efficiency.
Conclusion
Whether installing hydronic radiant heat over concrete slab or upgrading existing floors, selecting the right insulated system makes a huge difference in comfort and performance. Proper concrete slab insulation for radiant heat minimizes energy loss, while radiant heat concrete floor systems with integrated EPS backing ensure even warmth and efficiency. These systems allow radiant floor heating over existing concrete slab installations to perform at their best, delivering steady comfort, fast response, and reduced energy use season after season.
Find out more about WBI’s EPS Panel Options
Get a project-specific quote for your slab-on-grade, basement, garage or remodel. We’ll help you choose the right panel solution for your project.
Let Us Help You Find the Right Panel for Your Over Concrete Application
We are here to help you select the right panels for your radiant heat application. Give us a call.


